Important Notices#
- As of January 9, 2024 MFA is enforced for all UManitoba/Grex users.
- We appreciate your attention to this matter and encourage you to enroll at your earliest convenience to ensure a smooth transition. Should you have any questions or require further assistance, please don’t hesitate to reach out to your local HPC team.
- If some of your work relies on unattended connections or automations that may be disrupted by MFA, we ask that you do not enroll yet, and instead contact us for technical support, so that we can work with you on a solution.
- Please note that enrolling in MFA for Grex, makes MFA active and enforced also on the Alliance National systems as well, and vice versa. If this does not work for you, please contact us .
Multi-Factor Authentication#
Both Digital Research Alliance of Canada and our UManitoba HPC systems are using a multifactor authentication (MFA) system. MFA adds an additional layer of security to the traditional password-based and SSH keys authentications by requiring a second factor, known as “something you have”. The Cisco Duo product was chosen as the provider for this additional authentication factor. Grex is using the Duo instance provided by the Alliance. The available additional factors and even the MFA provider are not the same as those used by the University of Manitoba for platforms such as UM Intranet and University MS Office products.
On Grex and Alliance systems, the following factors are enabled:
- Duo smartphone app (Android and iOS)
- Yubico Yubikey cybersecurity USB key device
- One-time codes (recommended as a backup, available only after one of the above primary factors is already enabled)
Enrollment#
Enrollment into the Alliance Duo is through CCDB , this enables the MFA requirement on every SSH login on both Grex and Alliance systems .
You must follow these steps to start using Grex and Alliance systems:
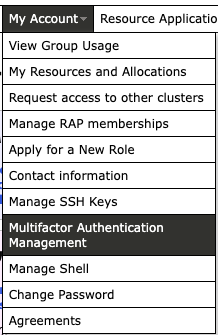
- login into CCDB with your credentials
- from the top menu choose “My Account” => “Multifactor Authentication Management”
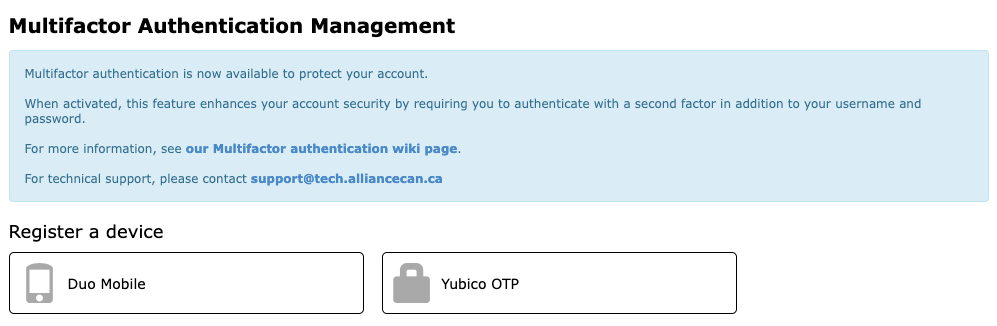
- register a new device
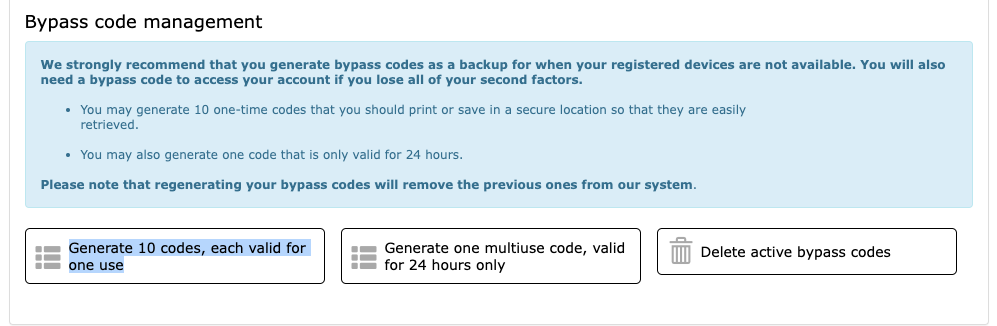
- OPTIONAL BUT RECOMMENDED at the bottom of the same page, use the “Generate 10 codes” button to generate 10 rescue codes (you must print/save these codes in a safe location and never disclose them to anyone)
- additional information on the Alliance official wiki
The following images should better explain the previous steps.
Data transfer on MFA-enabled systems#
MobaXTerm#
- Upgrade to version 23.1 or more recent
- Test the connection
If problems persist, try a combination of the following:
- Use a keypair instead of password
- Use “SCP (normal speed)” instead of “SFTP” (under “Advanced SSH settings”)
WinSCP#
- Upgrade to version 6.1.1 or more recent
- Use a keypair instead of password
- Use the SFTP app insead of SSH browser app.
- Test the connection
CyberDuck#
CyberDuck supports MFA for SFTP out of the box.
- Upgrade to version 9 or newer.
- Optionally, provide SSH private key instead of password
PyCharm#
- Use a keypair instead of password
- Test the connection
FileZilla#
FileZilla will ask the password and second factor each time a transfer is initiated, because by default transfers use independent connections which are closed automatically after some idle time.
To avoid entering the password and second factor multiple times, you can limit the number of connections to each site to “1” in “Site Manager” => “Transfer Settings tab”, note that then you’ll lose the ability to browse the server during transfers.
- Launch FileZilla and select “Site Manager”
- From the “Site Manager”, create a new site (or edit an existing one)
- On the “General” tab, specify the following:
- Protocol: “SFTP – SSH File Transfer Protocol”
- Host: the cluster login hostname
- Logon Type: “Interactive”
- User: your CCDB username
- On the “Transfer Settings” tab, specify the following:
- Limit number of simultaneous connections: checked
- Maximum number of connections: 1
- Select “OK” to save the connection
- Test the connection
Ubuntu Nautilus File Manager#
Nautilus uses GVFS to allow browsing remote locations through ssh, but it doesn’t support MFA login.
As a workaround, you can use ssh connection multiplexing, with a (not) well-known location for the control socket:
- For GVFS versions 1.47 and later:
$ ssh -fNMS "$XDG_RUNTIME_DIR/gvfsd-sftp/%C" ccdb_username@grex_login_hostname
$ gio mount sftp://ccdb_username@grex_login_hostname
-- USE NAUTILUS TO BROWSE REMOTE FILES --
- For GVFS before version 1.47 (The “echo” command must be execute only once):
$ echo -e 'Host *\n\tControlPath ~/.ssh/S.%r@%h:%p' >> ~/.ssh/config
$ ssh -fNM ccdb_username@grex_login_hostname
$ gio mount sftp://ccdb_username@grex_login_hostname
-- USE NAUTILUS TO BROWSE REMOTE FILES --
Note that if the master connection gets closed for any reason (e.g.: timeout, lost connection, …), then it must be restarted manually to keep browsing the remote location.
Configuring OpenSSH clients for longer MFA sessions#
For the users of OpenSSH clients on Linux, MacOS, and Windows (see SSH ) it is possible to reduce the number of second-factor challenges by caching them between sessions for a period of time. This can be configured in the OpenSSH client’s user config as follows.
Edit or create the file $HOME/.ssh/config that contains a config similar to this :
Host yak.hpc.umanitoba.ca
    ControlPath ~/.ssh/cm-%r@%h:%p
    ControlMaster auto
    ControlPersist 10m
The example above uses the Yak login node of Grex; replace it with other hostnames as required, or add sections for more than one host if needed.